A Facebook friend shared a recipe for unstuffed cabbage rolls a few weeks back. I did a quick screenshot of the recipe on my phone and then forgot about it. We were running low on cash this week so I had a light bulb moment and remembered this recipe. I wanted to link to the original recipe poster, but even though I stalked my friend's page like a private investigator, I couldn't find her original post. A quick search on Pinterest reveals a plethora of unstuffed cabbage roll recipes as well. I even found one that can be canned and a special little place in my heart warmed.
Every one in the family actually loved it! Even the littlest member. I knew I'd have to share it. I look forward to next year when I can grow all the ingredients myself!
Ingredients:
1.5 to 2 pounds of lean ground beef or ground pork
1 tablespoon extra virgin olive oil
1 large onion, chopped
1 green bell pepper, chopped
1 clove of garlic, minced
1 small cabbage, chopped
(2) 14.5 oz. cans of diced tomatoes
(1) 8 oz. can of tomato sauce
1/2 cup of water
1 teaspoon of ground black pepper
1 teaspoon of sea salt
In a stock pot, heat olive oil over medium heat. Add the ground beef (or pork), bell pepper, and onion and cook, stirring occasionally, until the meat is no longer pink and the onions and peppers are tender.
Add garlic and cook for 1 minute.
Add the chopped cabbage, tomatoes, tomato sauce, water, pepper, and salt. Bring it to a boil. Cover and simmer for 30 minutes, or until the cabbage is tender. Eat and enjoy!
That's it! The most work is chopping the veggies. I used two pounds of ground pork in ours because it was less expensive than the beef. I had to purchase the pork, onion, cabbage, diced tomatoes, and tomato sauce. My total was only $7.99. Guesstimating on the ingredients I already had, six people ate for less than $10. Plus I had leftovers.
This blog is an archive from 2007 through 2015 of my current blog site. To view posts after 2015, please visit www.nekaro.com.
Showing posts with label Recipes. Show all posts
Wednesday, July 8, 2015
Monday, December 15, 2014
Apple Cinnamon Oatmeal Cookies
I have been on a big cookie baking kick lately. I made the good ol' stand by peanut butter. I tried my hand at shortbread for the first time. I did not like them. Others said they were fine.
Finally I decided to make some yummy oatmeal cookies. I opened up my cabinets to grab the ingredients and something caught my eye. Hmmm... I wondered if I could change some of the basic ingredients and still get a yummy cookie.
I could. And I did. Now this may have been done before, but I've not seen it anywhere so I present to you...
My secret ingredient? Instant oatmeal. Apples & cinnamon flavor.
Ingredients:
Preheat oven to 375F degrees. Prepare your favorite cookie sheet. I like to line mine with parchment paper. Non-stick and easy clean up.
In a large bowl or stand mixer, cream together butter with granulated and brown sugars until combined. Add the eggs, one at a time, making sure to to beat well. Side note: I like to make sure my eggs are room temperature when I bake with them.
In another bowl, mix together the flour, baking soda, baking powder, and salt.
Slowly add the flour mixture to the sugar mixture.
Mix together the apple & cinnamon packets and the sliced almonds.
Gradually add to mixture in mixer/bowl. Side note: At this point I change to a dough hook, but I could have just used a spoon to mix them in.
Drop the dough by heaping tablespoons about 2 inches apart.
Bake for 10-12 minutes or until golden brown. Remove to cooling rack.
I got about 60-ish cookies from this batch, but of course the amount you get will depend on the size you start with. I didn't do specific measurements, just winged it. They are so delicious right out of the oven. There is almost nothing better than a fresh out of the oven cookie!
Printer friendly version can be found here!
Monday, December 1, 2014
Turkey Day Vittles
I hope everyone has survived the food coma that is Thanksgiving or the hell that is Black Friday shopping. I forego that most hated of all shopping days. I worked in retail for five years. I saw first hand the ridiculous things people will do for a $10 Care Bear. So instead of all that craziness, let's talk about food!
My mom made all the potatoes {sweet potatoes covered with marshmallows and cheesy potatoes} and the green beans. It always helps to outsource a few dishes! I did more pre-planning that I have in the past, which is great and I think I'll try to remember to do more earlier next year too!
On Monday, I made the herb butter for the turkey. I love basil. I love garlic. Goes without saying that I love pesto. Waiting for that butter to soften enough to mix together just about killed me. I kept walking in the kitchen and poking the sticks of butter.
I also decided to make my own ice cream. I don't have an ice cream maker so it took a little looking to find a recipe that was as simple as I could find. Thank goodness for Pinterest!
Definitely check out the other recipes on the Kevin and Amanda blog. There is one that uses Krispy Kreme donuts!
On Tuesday, I premade the bacon wrapped cheese stuffed mushrooms. I honestly just saw this picture on Facebook. I couldn't find an exact recipe, but come on. It's real simple.
Then I sat all day on Wednesday wondering if I should be cooking something else.
The big day arrived. I took my turkey out of the fridge, removed the bits, rinsed her thoroughly, and patted dry. I took my herb butter that I'd let sit out and get to room temperature and spread it under the skin along the breast side of the turkey, then spread it all over the skin on the breast, legs, wings, errreywhere. Put that bird in the oven and away we go! I took a walk on the wild side and cooked my turkey a little differently from the way I usually do. I left it uncovered and basted it (every thirty minutes after the first hour) with 2 sticks of melted butter. Then covered it for the last 45 minutes or so. It was awesome. See this unattractive yet falling off the bone photo!?
I made cornbread in my iron skillet and then this amazingly easy pear cobbler! Most people make pumpkin pie or apple pie for Thanksgiving dinners and I wanted to make something a little different.
I'm only including the chess pie debacle because this could happen to anyone. I used the chess pie recipe in one of Paula Deen's cookbooks. It's not the recipe that I used last year, but since I couldn't find it and a chess pie is so easy to make I figured, what could go wrong?! Not cooking it long enough. That's what could go wrong. Her recipe says to cook for only 35-45 minutes or until the top is browned nicely. On hindsight, and after looking at several other recipes after the fact, you should really cook these pies for about 55 minutes. My pie never set up and it was because that shit didn't cook long enough.
And I made the crust from scratch!! *stomps foot* Can I just scoop out all that chess-ness and eat the crust?!?!
My mom made all the potatoes {sweet potatoes covered with marshmallows and cheesy potatoes} and the green beans. It always helps to outsource a few dishes! I did more pre-planning that I have in the past, which is great and I think I'll try to remember to do more earlier next year too!
On Monday, I made the herb butter for the turkey. I love basil. I love garlic. Goes without saying that I love pesto. Waiting for that butter to soften enough to mix together just about killed me. I kept walking in the kitchen and poking the sticks of butter.
Basil Herb Butter
-2 teaspoons of dried basil (I would rather have used fresh, but it's expensive and NO ONE in our little town carries fresh)
-2 sticks of buttah, softened
-6 cloves of garlic (chopped and then chopped again, really chop it)
-2 tablespoons of lemon juice
-Mix together the dried basil, garlic, and lemon juice. Realize that the butter is still not softened enough, fix a cup of coffee and stare at the unsoftening butter. Come back after the second cup and throw that butter in the stand mixer, dump in the basil mix, turn the mixer on low, low, low speed. Tada! Herb butter! Put it in a small dish, refrigerate until you need it!
I also decided to make my own ice cream. I don't have an ice cream maker so it took a little looking to find a recipe that was as simple as I could find. Thank goodness for Pinterest!
{Cinnamon Bun version}
-2 cups of heavy cream
-1 (14oz.) can of sweetened condensed milk
-3 tablespoons butter, melted
-1/2 teaspoon ground cinnamon
-1/2 teaspoon vanilla extract
-Pour heavy cream into mixer. Whip. Whip it good. (You knew I was going to go there, right?) While that is mixing, pour sweetened condensed milk into a separate bowl, mix in butter, cinnamon, and vanilla. Once the cream is whipped to stiff peaks, fold in the condensed milk until it's all blended and delicious and m'mmmm..... cinnamon bun...
Pour all into a 2 quart dish (I used one of my glass bread pans) and freeze for at least 6 hours.
Definitely check out the other recipes on the Kevin and Amanda blog. There is one that uses Krispy Kreme donuts!
On Tuesday, I premade the bacon wrapped cheese stuffed mushrooms. I honestly just saw this picture on Facebook. I couldn't find an exact recipe, but come on. It's real simple.
Bacon Wrapped Cheese Stuffed Mushrooms
-fresh mushrooms, as many packages as you think y'all will eat, we used two
-string cheese
-bacon
Wash or wipe dirt from mushrooms, remove stems. If you wash them make sure that you pat the excess moisture away. Slice string cheese into 1/2 inch pieces. No need to be too precise with that because some mushrooms are larger than others. I just winged it. I cut the slab of bacon in half and wrapped each mushroom with half a piece of bacon. Cook in a preheated 350F degree oven for 20-ish minutes.
-fresh mushrooms, as many packages as you think y'all will eat, we used two
-string cheese
-bacon
Wash or wipe dirt from mushrooms, remove stems. If you wash them make sure that you pat the excess moisture away. Slice string cheese into 1/2 inch pieces. No need to be too precise with that because some mushrooms are larger than others. I just winged it. I cut the slab of bacon in half and wrapped each mushroom with half a piece of bacon. Cook in a preheated 350F degree oven for 20-ish minutes.
Then I sat all day on Wednesday wondering if I should be cooking something else.
The big day arrived. I took my turkey out of the fridge, removed the bits, rinsed her thoroughly, and patted dry. I took my herb butter that I'd let sit out and get to room temperature and spread it under the skin along the breast side of the turkey, then spread it all over the skin on the breast, legs, wings, errreywhere. Put that bird in the oven and away we go! I took a walk on the wild side and cooked my turkey a little differently from the way I usually do. I left it uncovered and basted it (every thirty minutes after the first hour) with 2 sticks of melted butter. Then covered it for the last 45 minutes or so. It was awesome. See this unattractive yet falling off the bone photo!?
I made cornbread in my iron skillet and then this amazingly easy pear cobbler! Most people make pumpkin pie or apple pie for Thanksgiving dinners and I wanted to make something a little different.
Pear Cobbler
- 1/2 cup or 1 stick of butter
-3/4 cup milk
-1 cup sugar
- (2) 15 oz. cans of pear halves in heavy syrup, cut into bite size pieces
-3/4 cup of self-rising flour
Put the butter in the baking dish and place it in a pre-heated 350F degree oven until the butter melts. While the butter is melting, stir together the sugar and flour. Slowly stir in the milk and mix well. Remove the dish from the oven, pour the batter over the melted butter and DO NOT STIR. Place pears on top of the batter and slowly pour the syrup over the pears and DO NOT STIR. Bake the cobbler for about 30 mins.
I'm only including the chess pie debacle because this could happen to anyone. I used the chess pie recipe in one of Paula Deen's cookbooks. It's not the recipe that I used last year, but since I couldn't find it and a chess pie is so easy to make I figured, what could go wrong?! Not cooking it long enough. That's what could go wrong. Her recipe says to cook for only 35-45 minutes or until the top is browned nicely. On hindsight, and after looking at several other recipes after the fact, you should really cook these pies for about 55 minutes. My pie never set up and it was because that shit didn't cook long enough.
And I made the crust from scratch!! *stomps foot* Can I just scoop out all that chess-ness and eat the crust?!?!
Monday, September 15, 2014
Keep Calm and ... Oh Who Am I Kidding
No time to keep calm about anything around here! Totally missed the "Currently" post last week. Forgot all about it. I'm just going to do a quick little post so y'all know I haven't skipped the country.
A mod podge of everything...
+ Finally finished the first four seasons of Lost Girl! I promptly realized that the next season doesn't start until NEXT YEAR! WHAT?!
+ Tried Jamberry Nail Wraps for the first time. See here, here, and here. It didn't go as well as I would have liked. I took them off after just a week. First time application combined with user error and it wasn't working. Currently I'm on the next wraps, used one of their application kits, process was much easier. Practice makes perfect with these things.
+ Football game Friday night. The daughter was MIA for the band halftime show. Thirteen year old drama ensued. Cell phone confiscated.
+ Saturday there were two band competitions.
- See last point. Late night followed by a full day of competitions. Zombie mom.
-The first competition was the home hosted show. I was slung into a volunteer position. Thankfully it didn't involve too much interaction with people. Except I was to ensure that no one was run over by the exiting PIT equipment. Apparently no one understands the concept of NOT CROSSING the bright yellow "DO NOT CROSS" POLICE LINE tape. People kept just going under it until I looked like the psycho band mom who was all... STOP CROSSING OVER MY "DO NOT CROSS" POLICE TAPE!!!!
- My lips got sun and wind burned.
- Second competition. We arrived and the stadium was full. They had roped off a section for visiting bands. Except it wasn't big enough. So they opened up half of it for spectators instead.
- Forgot my throw blanket. Promptly froze while sitting in the stands. Because... HELLO FALL WEATHER!
- Concession stand had no hot cocoa. Or coffee.
+ Recipes I used this week that I didn't have time to photograph or write a post about.
- Oven Tacos from Mommy? I'm Hungry!
- Tomato and Mozzarella Pasta from Annie's Eats
A mod podge of everything...
+ Finally finished the first four seasons of Lost Girl! I promptly realized that the next season doesn't start until NEXT YEAR! WHAT?!
+ Tried Jamberry Nail Wraps for the first time. See here, here, and here. It didn't go as well as I would have liked. I took them off after just a week. First time application combined with user error and it wasn't working. Currently I'm on the next wraps, used one of their application kits, process was much easier. Practice makes perfect with these things.
+ Football game Friday night. The daughter was MIA for the band halftime show. Thirteen year old drama ensued. Cell phone confiscated.
+ Saturday there were two band competitions.
- See last point. Late night followed by a full day of competitions. Zombie mom.
-The first competition was the home hosted show. I was slung into a volunteer position. Thankfully it didn't involve too much interaction with people. Except I was to ensure that no one was run over by the exiting PIT equipment. Apparently no one understands the concept of NOT CROSSING the bright yellow "DO NOT CROSS" POLICE LINE tape. People kept just going under it until I looked like the psycho band mom who was all... STOP CROSSING OVER MY "DO NOT CROSS" POLICE TAPE!!!!
- My lips got sun and wind burned.
- Second competition. We arrived and the stadium was full. They had roped off a section for visiting bands. Except it wasn't big enough. So they opened up half of it for spectators instead.
- Forgot my throw blanket. Promptly froze while sitting in the stands. Because... HELLO FALL WEATHER!
- Concession stand had no hot cocoa. Or coffee.
+ Recipes I used this week that I didn't have time to photograph or write a post about.
- Oven Tacos from Mommy? I'm Hungry!
- Tomato and Mozzarella Pasta from Annie's Eats
Wednesday, August 13, 2014
Stupid Simple Chicken Quesadillas
Another Pinterest find. I would not know how to cook without Pinterest. We'd all be eating the same meals over and over. I do love a physical cookbook though. The original recipe can be found over at Six Sisters' Stuff right here.
This recipe really is stupid simple to make. You need just a handful of ingredients to get started.
What you'll need:
-- 3 to 4 boneless skinless chicken breasts (I used 3, made 6 quesadillas and still had chicken left over)
-- a can of Rotel tomatoes and green chilies, undrained (the can I used was 10-ish ounces)
-- a package of cream cheese
-- a couple of tablespoons of butter, melted
-- tortillas
-- shredded cheese of your choice, we used Monterrey jack
-- toppings/salsa/dip of your choice
Simple to make too:
-- Spray your slow cooker with non-stick spray or, if like me you don't have any, smear some Crisco on the bottom and around the sides.
-- Put the chicken in, add the undrained can of Rotel, and then cream cheese. I chose to slice up my cream cheese. Put the lid on and set your slow cooker to low for 6-8 hours.
Do not be alarmed if you come back in a few hours and your cream cheese still looks exactly the same. 'Cause it will, but it's ok. The next step will fix that.
-- Once the chicken is done, shred it and put it back in the slow cooker. Mix all those ingredients together and let sit for a bit so the chicken will absorb some of the juices. It's still going to be a little watery so use a slotted spoon to put chicken in tortillas.
-- Take tortillas and spread cheese on them.
-- Put a spoonful or two of the chicken mix on one side of the tortilla. At this point, you can add any little do-dads you would like. We ate ours "original" for this first attempt, but my husband and I both agreed that next time we will definitely add some jalapenos or banana peppers.
-- Fold tortilla in half and brush with butter before placing in a pre-heated skillet.
-- Cook for a few minutes on both sides until the cheese is melted and TADA! All done. Wait a few minutes for them to cool then cut them in half and serve with salsa, sour cream, or whatever your heart desires!
This recipe really is stupid simple to make. You need just a handful of ingredients to get started.
What you'll need:
-- 3 to 4 boneless skinless chicken breasts (I used 3, made 6 quesadillas and still had chicken left over)
-- a can of Rotel tomatoes and green chilies, undrained (the can I used was 10-ish ounces)
-- a package of cream cheese
-- a couple of tablespoons of butter, melted
-- tortillas
-- shredded cheese of your choice, we used Monterrey jack
-- toppings/salsa/dip of your choice
Simple to make too:
-- Spray your slow cooker with non-stick spray or, if like me you don't have any, smear some Crisco on the bottom and around the sides.
-- Put the chicken in, add the undrained can of Rotel, and then cream cheese. I chose to slice up my cream cheese. Put the lid on and set your slow cooker to low for 6-8 hours.
Do not be alarmed if you come back in a few hours and your cream cheese still looks exactly the same. 'Cause it will, but it's ok. The next step will fix that.
-- Once the chicken is done, shred it and put it back in the slow cooker. Mix all those ingredients together and let sit for a bit so the chicken will absorb some of the juices. It's still going to be a little watery so use a slotted spoon to put chicken in tortillas.
-- Take tortillas and spread cheese on them.
-- Put a spoonful or two of the chicken mix on one side of the tortilla. At this point, you can add any little do-dads you would like. We ate ours "original" for this first attempt, but my husband and I both agreed that next time we will definitely add some jalapenos or banana peppers.
-- Fold tortilla in half and brush with butter before placing in a pre-heated skillet.
-- Cook for a few minutes on both sides until the cheese is melted and TADA! All done. Wait a few minutes for them to cool then cut them in half and serve with salsa, sour cream, or whatever your heart desires!
Tuesday, July 29, 2014
Made from Scratch Apple Pie
It's no secret that I love to bake goodies. I have never attempted to bake a pie though. For her birthday, Kaia requested I make her an apple pie. She's on a Supernatural bender. Neflixing the shit out of it. Dean loves pie so Kaia loves pie.
I used four recipes to complete the pie. The crust recipe from the book that came with my mixer, two recipes from the Pioneer Woman, and the super simple whipped cream recipe I shared in June. It sounds a little excessive, but it was really much easier than expected.
All the ingredients:
Just 10 things. There are 11 items pictured, but I changed what crust recipe I was using at the last minute and did not use the vinegar.
First up: KitchenAid Pie Pastry (right here is where I would link to the recipe if it were on the internet...)
What you need: 2 1/4 cups all-purpose flour, 3/4 teaspoon salt, 1/2 cup shortening, well chilled, 2 tablespoons butter or margarine, well chilled, 5 to 6 tablespoons cold water.
What to do:
-Place flour and salt in bowl, mix well. (In stand mixer, stir speed for about 15 seconds.)
-Cut shortening and butter into pieces and add to flour mixture, use pastry cutter to cut them into flour. (In stand mixer, stir speed and mix until shortening particles are size of small peas, about 30-45 seconds.
-Add water 1 tablespoon at a time until dough is just moistened and begins to hold together. Divide it in half, flatten slightly, wrap in plastic wrap, and chill in the refrigerator for 15 minutes.
-Roll half the dough out until it's 1/8-inch thick between wax paper (I used parchment paper), place in pie dish. Finish it off with pie filling. Bake as directed.
I only used one of the two because the recipe for the pie itself has THE MOST AMAZING CRUMB TOPPING so I refrigerated the other half to use later.
I peeled, cored, and sliced the apples according to the Pioneer Woman's Scrumpcious Apple Pie recipe. I used all Granny Smith apples, but it was a little more tart than I would have liked so next time (and there will totes be a next time) I think I may mix in some Red Delicious because my brain was thinking about baked apple, but my mouth said tart apples. Tossed the apples with lemon juice, sugar, flour, and a little salt. Then I made that crumb topping. M'mmmmm..... crumb topping...
At first, I thought the recipe was a misprint because it states to cut 1 1/2 sticks of butter into 1/2 cup of flour, but it is totally correct and as I was cutting it in I realized it mixed up very well. Then you add in brown sugar, quick cook oats, and a little salt. Put the apple mixture in the pie dish and top with the crumb topping. I meant to take a photo because this pie was heaping! I thought I was going to need a bigger dish! Instead I just squished it all down, covered the edges of the crust with aluminum foil and baked, baked, baked. After about 25 minutes, I removed the foil and continued to cook for another 30 minutes. With five minutes left, add some chopped up pecans.
While that was cooking, I moved on to the caramel sauce, another first, and I followed the Pioneer Woman's Easy Caramel Sauce recipe. Ermahgerd. So easy. So damn good. You just put brown sugar, butter, half-and-half or heavy cream (I used heavy cream because I also made my own whipped cream), vanilla, and salt in a sauce pan. Warm and stir. Sample. Sample again just to be sure. If you think it's too thin, continue cooking. I followed her directions though and once I let it sit and cool a bit on the counter while the pie was cooking, it thickened up nicely on its own.
As soon as I took the pie out of the oven, I drizzled it with caramel sauce. When I thought I had added enough, I added more. I had a lot left over so I put it into one of those El Cheapo condiment dispensers and I may or may not (of course I did!) put some in my coffee in the morning. Letting the pie cool was the hardest thing to do, but it gave that caramel sauce time to form a nice caramelly crustiness on top of the brown sugary crumb topping. M'mmm... camamelly crumb topping.....
Then I smacked some whipped cream on that shit and drizzled yet more caramel sauce on top. And we all sat around drooling, mmmmm'ing, and in awe of the fact that the pie crust turned out awesome!
I was pretty apprehensive about this whole thing. Pies look so intimidating to me, but this all came together so well. And really, just 10 ingredients. I'm already thinking ahead to the holidays.
You get a pie! And you get a pie! And, yes, YOU GET A PIE TOO!
*I included the pie crust recipe because it was from a book, but I didn't share the exact recipes of the others because they are easily found online. Plus I didn't want to even remotely be accused of infringing on anyone's copyright. Ya feel me?
I used four recipes to complete the pie. The crust recipe from the book that came with my mixer, two recipes from the Pioneer Woman, and the super simple whipped cream recipe I shared in June. It sounds a little excessive, but it was really much easier than expected.
All the ingredients:
Just 10 things. There are 11 items pictured, but I changed what crust recipe I was using at the last minute and did not use the vinegar.
First up: KitchenAid Pie Pastry (right here is where I would link to the recipe if it were on the internet...)
What you need: 2 1/4 cups all-purpose flour, 3/4 teaspoon salt, 1/2 cup shortening, well chilled, 2 tablespoons butter or margarine, well chilled, 5 to 6 tablespoons cold water.
What to do:
-Place flour and salt in bowl, mix well. (In stand mixer, stir speed for about 15 seconds.)
-Cut shortening and butter into pieces and add to flour mixture, use pastry cutter to cut them into flour. (In stand mixer, stir speed and mix until shortening particles are size of small peas, about 30-45 seconds.
-Add water 1 tablespoon at a time until dough is just moistened and begins to hold together. Divide it in half, flatten slightly, wrap in plastic wrap, and chill in the refrigerator for 15 minutes.
-Roll half the dough out until it's 1/8-inch thick between wax paper (I used parchment paper), place in pie dish. Finish it off with pie filling. Bake as directed.
I only used one of the two because the recipe for the pie itself has THE MOST AMAZING CRUMB TOPPING so I refrigerated the other half to use later.
I peeled, cored, and sliced the apples according to the Pioneer Woman's Scrumpcious Apple Pie recipe. I used all Granny Smith apples, but it was a little more tart than I would have liked so next time (and there will totes be a next time) I think I may mix in some Red Delicious because my brain was thinking about baked apple, but my mouth said tart apples. Tossed the apples with lemon juice, sugar, flour, and a little salt. Then I made that crumb topping. M'mmmmm..... crumb topping...
At first, I thought the recipe was a misprint because it states to cut 1 1/2 sticks of butter into 1/2 cup of flour, but it is totally correct and as I was cutting it in I realized it mixed up very well. Then you add in brown sugar, quick cook oats, and a little salt. Put the apple mixture in the pie dish and top with the crumb topping. I meant to take a photo because this pie was heaping! I thought I was going to need a bigger dish! Instead I just squished it all down, covered the edges of the crust with aluminum foil and baked, baked, baked. After about 25 minutes, I removed the foil and continued to cook for another 30 minutes. With five minutes left, add some chopped up pecans.
While that was cooking, I moved on to the caramel sauce, another first, and I followed the Pioneer Woman's Easy Caramel Sauce recipe. Ermahgerd. So easy. So damn good. You just put brown sugar, butter, half-and-half or heavy cream (I used heavy cream because I also made my own whipped cream), vanilla, and salt in a sauce pan. Warm and stir. Sample. Sample again just to be sure. If you think it's too thin, continue cooking. I followed her directions though and once I let it sit and cool a bit on the counter while the pie was cooking, it thickened up nicely on its own.
As soon as I took the pie out of the oven, I drizzled it with caramel sauce. When I thought I had added enough, I added more. I had a lot left over so I put it into one of those El Cheapo condiment dispensers and I may or may not (of course I did!) put some in my coffee in the morning. Letting the pie cool was the hardest thing to do, but it gave that caramel sauce time to form a nice caramelly crustiness on top of the brown sugary crumb topping. M'mmm... camamelly crumb topping.....
Then I smacked some whipped cream on that shit and drizzled yet more caramel sauce on top. And we all sat around drooling, mmmmm'ing, and in awe of the fact that the pie crust turned out awesome!
I was pretty apprehensive about this whole thing. Pies look so intimidating to me, but this all came together so well. And really, just 10 ingredients. I'm already thinking ahead to the holidays.
You get a pie! And you get a pie! And, yes, YOU GET A PIE TOO!
*I included the pie crust recipe because it was from a book, but I didn't share the exact recipes of the others because they are easily found online. Plus I didn't want to even remotely be accused of infringing on anyone's copyright. Ya feel me?
Friday, June 13, 2014
Whip It
Yeah, so I just got a KitchenAid stand mixer for Mother's Day. I've made three things. Bread, cookies, and...
WHIPPED CREAM.
Oh my dear lord. Don't get me wrong, I love me some Cool Whip, but I don't love what is actually in it. Things like vegetable oils, corn syrup, and sorbitan monostearate (I don't even know what that is...). A quick trip through the ever faithful Pinterest showed me I could make my own with far less chemicals and little effort.
Here's how you do it...
WHIPPED CREAM.
Oh my dear lord. Don't get me wrong, I love me some Cool Whip, but I don't love what is actually in it. Things like vegetable oils, corn syrup, and sorbitan monostearate (I don't even know what that is...). A quick trip through the ever faithful Pinterest showed me I could make my own with far less chemicals and little effort.
Here's how you do it...
- heavy whipping cream
- powdered sugar (a friend told me she uses regular sugar and has never had a problem)
- vanilla extract
Yes, that's all you need. I have used plain vanilla extract and I've used a combo flavoring I have (it's imitation! *gasp*) that is vanilla, nut, and butter. I've been toying with the idea of doing a peppermint one... haven't gotten that brave yet.
I'm sure you can do this with a hand mixer as well, but having a stand mixer is so awesome! Fair warning only vague measurements are being used.
1) Pour a cup or so (depends on how much whipped cream you need) into the mixer. On my mixer I turned it up to 8. Not super sonic fast, but fast. Mix for a couple of minutes until you have soft-ish peaks and the cream kind of coats the whisk.
2) Add sugar. I add a 1/4 to 1/2 cup of powdered sugar, but you can adjust to your liking. You'll also add in a teaspoon or so of vanilla or whatever flavoring you choose. Then turn the mixer back on and whip for a few more minutes until you notice that it is becoming more stiff.
M'mmmm.... whipped cream....
I really have nothing to put this on. I just had about half a carton of whipping cream left in the fridge that was about to go bad. I like to put a few spoonfuls in my morning coffee. D-e-l-c-ious.
Now go forth and make the world a little sweeter!
Wednesday, June 11, 2014
DIY Pizza Pockets
Like most folks, I ogle the beautiful pins on Pinterest. Knowing damn good and well that when I attempt whatever cutesy do-dad I pin, it will not turn out cutesy. So I ran across a pin for pizza monkey bread and I said, "Ooo! That looks pretty easy. I could totally do that!" I clicked it.
Do you know what happened? Nothing. It just linked to the photo. No recipe. No instructions. This was a pain in the ass. I could have just searched for the recipe, but I made the executive decision to wing it instead. Instead of monkey bread (because I couldn't make it look right in the bundt pan), mine morphed into pizza pockets.
And here is how I made them...
What You Need:
~Canned biscuits in the amount you wish to make
~Pizza toppings of your choice: pepperoni, black olives, mushrooms, green peppers, onions, cheese, etc.
~Marinara sauce and/or garlic butter for dipping
How to Make 'em:
1. Separate biscuits. Take one and roll it out.
2. Place ingredients inside. I suggest not using the marinara on the inside. Every time I've attempted this has ended in an ugly mess that was less than desirable.
3. Fold biscuit over and pinch the edges together. Repeat with other biscuits.
4. Line a baking sheet with parchment paper. Bake at 350 degrees for about 15 mins.
5. Enjoy with your favorite dipping sauce!
A few of mine split open because I didn't roll them out enough. No worries, they still tasted great!
Do you know what happened? Nothing. It just linked to the photo. No recipe. No instructions. This was a pain in the ass. I could have just searched for the recipe, but I made the executive decision to wing it instead. Instead of monkey bread (because I couldn't make it look right in the bundt pan), mine morphed into pizza pockets.
And here is how I made them...
What You Need:
~Canned biscuits in the amount you wish to make
~Pizza toppings of your choice: pepperoni, black olives, mushrooms, green peppers, onions, cheese, etc.
~Marinara sauce and/or garlic butter for dipping
How to Make 'em:
1. Separate biscuits. Take one and roll it out.
2. Place ingredients inside. I suggest not using the marinara on the inside. Every time I've attempted this has ended in an ugly mess that was less than desirable.
3. Fold biscuit over and pinch the edges together. Repeat with other biscuits.
4. Line a baking sheet with parchment paper. Bake at 350 degrees for about 15 mins.
5. Enjoy with your favorite dipping sauce!
A few of mine split open because I didn't roll them out enough. No worries, they still tasted great!
Monday, February 3, 2014
Repost: Tacos a la Pasta sans Tortillas
I was looking back through my archives and I came across this recipe. I can't believe I haven't made this since last year! It was so easy and so yummy! I decided to revive it and give it a repost!
This is a yummy recipe that I stumbled across in an old handwritten cookbook. I am always looking for recipes with few ingredients and quick cook times. This is one of those recipes.
Most families love tacos for their ease of cooking and eating, but sometimes they can be pretty messy. This recipe helps keep the mess to a minimum, tastes great, and can be adjusted so easy for any families likes or dislikes!
Add these to your grocery list:
1 (16 oz.) package of medium pasta shells
1 lb. of ground beef (or turkey)
1 (26 oz.) jar of spaghetti sauce
1 envelope of taco seasoning
1 (8 oz.) carton spreadable chive and onion cream cheese (I used Philadelphia Italian Cheese and Herb Cooking Creme)
1 cup (8 oz.) sour cream
1 cup (4 oz.) shredded cheddar cheese (or more to taste and I think we used the "Mexican" blend, but again you can change it up and use any blend of shredded cheese)
Get started:
Preheat oven to 350F.
Cook the pasta per package instructions. Once that is started, cook beef (or turkey) in large skillet until no longer pink; drain.
Stir in the spaghetti sauce and taco seasoning.
In a small bowl, combine cream cheese and sour cream; set aside.
Drain the pasta; stir in beef mixture. Transfer to a greased 13" x 9" baking dish. Spread the cream cheese/sour cream mix on top then sprinkle with shredded cheese.
Bake, uncovered, for 25-30 minutes or until the cheese is melted.
Yields 8-10 servings. Total time: 45 mins.
Tuesday, January 14, 2014
Chicken Salad Sammies
The original recipe that I had every intention of using included grapes, celery, and both dry and liquid ranch dressing. Mine does not. See here's what happened...
I forgot the grapes. I don't like celery. And... I thought we had ranch dressing in the fridge because that's a staple that should always be in your fridge, right? Plus a couple of weeks ago, I'd used a half an envelope of dry ranch dressing mix in another recipe. As I was getting all the ingredients ready, I realized that we, in fact, did not have any ranch dressing. No liquid in the fridge. No half a dry mix packet.
D'oh.
So what do you do when you don't have half of the ingredients? Just make up your own recipe. I will tell you that I didn't measure many of these ingredients. The measurements that I'm showing are guesstimates. As will most recipes, it's just a guideline.
Ingredients:
1 12.5 oz can of chicken breast
1 tablespoon of Good Seasons Italian dressing mix
1 teaspoon of dry dill weed
1/2 cup of mayonnaise (or salad dressing if that's what you prefer!)
1/2 cup of sliced almonds
Sandwich rolls
What I did:
Drain chicken, place in bowl. Using a fork, break up the larger pieces of chicken to make mixing easier. Add all ingredients and mix! Put some of the mixture on a roll. Done!
I bought some yummy Kaiser rolls in the bakery at Wal-Mart. I knew we weren't going to eat them for a couple of days so I placed them in the freezer. Taking them out that morning to thaw. I also warmed them for a few seconds in the microwave before putting the chicken salad on them. They were really yummy, but I'd still like to try the original recipe as well!
Recipe adapted from Mom's Chicken Salad Sandwiches.
Wednesday, January 8, 2014
Hawaiian BBQ Chicken
The crazy cold weather is no secret to most of the nation. We are experiencing colder weather than we have had in 20 years here in Kentucky. I didn't take all this frigid cold into consideration when I made up the meal plan for this week. Instead I just focused on what nights we would be out late for ball games. That meant that Monday and Tuesday would be slow cooker nights.
Kind of ironic that on a day when the high temperature was only forecast to be 4F (with a wind chill of -20F), that I had planned to cook HAWAIIAN BBQ CHICKEN.
All day I'm looking out the frosty windows. And smelling some Hawaiian cooking BBQ chicken in my kitchen.
It smelled DELICIOUS!
From original site(found through Pinterest, of course!)--
Ingredients:
4-6 boneless skinless chicken breasts
a bottle of Hawaiian style BBQ sauce
a can of pineapple chunks
rice
Make: Place the chicken in crock, then cover with sauce and pineapples. Cook on low 4-6 hours. Shred chicken in the crock and serve over rice.
What I did: I already had some drumsticks in the freezer so I used them to save a little money. The original recipe site uses BBQ sauce purchased from Target (Archer Farms Hawaiian style BBQ sauce). For me, going to Target requires driving 35 miles out of my way so I checked at the place I was at (Wal-Mart). No Hawaiian style sauce. Dilemma. I chose honey BBQ sauce and added in the 100% juice from the pineapple chunks! I also opted to cook mine in a 9 x 13 baking dish simply because the added warmth from the oven was welcome in this cold!
I'm not usually a fan of sweet entrees. I like my meat savory. But this chicken? It's so yummy! We served ours with whole grain rotini. Mainly because my husband turns his nose up at any kind of rice other than saffron. I think it would be great no matter what it's served with!
Friday, January 3, 2014
Super Simple Pot Roast
Generally, pot roast is pretty simple to begin with, but I found this recipe that has only five ingredients and tastes amazing!
Cook on low for 8 hours. Remove from crock, let it rest, then EAT IT!
So good. So simple. I found that adding a bit of the juice from cooking made it even better. The next day I threw some in a tortilla with banana peppers and Monterey Jack cheese. Mmm... mmm... Just writing this post, I'm getting hungry. Might need to make a run to the grocery!
Ingredients:
-Any size beef roast sized to fit your crock pot (or in my case, I used my Clay Cooker)
-1/2 cup of warm water
and...
a package of brown gravy mix, ranch dressing mix, and Italian dressing mix. I grabbed the zesty Italian, but regular will be fine.
Place the roast in the crock pot.
In a separate bowl, mix together all dry ingredients then rub them on the roast. Add 1/2 cup of warm water.
Cook on low for 8 hours. Remove from crock, let it rest, then EAT IT!
So good. So simple. I found that adding a bit of the juice from cooking made it even better. The next day I threw some in a tortilla with banana peppers and Monterey Jack cheese. Mmm... mmm... Just writing this post, I'm getting hungry. Might need to make a run to the grocery!
Wednesday, December 11, 2013
The Foodie in Me
I haven't shared a recipe in some time. Not a new one anyway. You know why? Because every single time I try a new recipe or deviate from the "normal", someone won't eat. Usually it's either the 12 year old or the 14 year old, however, occasionally it's the 35 year old. Normal is more frozen pizzas than I really want to admit.
It's such a pain to find something that agrees with everyone. And the oldest daughter goes between being a vegetarian and not being a vegetarian. I'm always so confused on what to buy.
This week's meals are a bit up in the air. I haven't been on a real grocery run since before we were expecting serious weather last week. One bright spot is lunch time. It is just myself and the 2 year old. She is very open to trying new foods. I'm sure this will change as she gets older so I'm taking advantage as much as I can.
I opened up the cabinets. Hmmm... well, yes they are a bit bare. A little of this, a little of that. I decided the asparagus and tuna both looked like they wanted me to eat them. But how to fix them....?
Away to Pinterest I go!
I went looking for one recipe. Spent more than an hour perusing and ended up making two new boards. Sheesh! However, I was able to find something! An asparagus salad with tuna dressing from the Hellman's site that is apparently a Mario Batali recipe.
I looked over the recipe, nodded my head, and decided that I could make it work. Very loosely based on the actual recipe though and I didn't actually measure any of my ingredients.
So.... I opened one can of asparagus, drained them well, then put them in a skillet with just a half tablespoon of butter. While they were warming in the skillet on medium low, I put about a cup of mayonnaise, a couple of tablespoons of lemon juice, one large minced up clove of garlic, a pinch of salt, somewhere around a teaspoon-ish of dried dill, and half of the can of drained tuna in water in a bowl and mixed them all together. I let that sit and ruminate on how all those ingredients were working well with each other while the asparagus simmered in it's buttery goodness. Once the asparagus was heated through, I just placed it on a plate then spooned the tuna mixture on top. Done. I think it would have been even better with a few thinly sliced pieces of Monterey Jack on it.
I didn't photograph it. Mainly because I was hungry, but also because I didn't even think about blogging it. Just know it looked just as good as that image from the website. And tasted even better!
The amounts that I used were more of a two serving meal as I had enough left that I can warm it up for lunch tomorrow. If I fixed this for everyone, I would double it. If you try it (or something similar), let me know how it turns out!
It's such a pain to find something that agrees with everyone. And the oldest daughter goes between being a vegetarian and not being a vegetarian. I'm always so confused on what to buy.
This week's meals are a bit up in the air. I haven't been on a real grocery run since before we were expecting serious weather last week. One bright spot is lunch time. It is just myself and the 2 year old. She is very open to trying new foods. I'm sure this will change as she gets older so I'm taking advantage as much as I can.
I opened up the cabinets. Hmmm... well, yes they are a bit bare. A little of this, a little of that. I decided the asparagus and tuna both looked like they wanted me to eat them. But how to fix them....?
Away to Pinterest I go!
I went looking for one recipe. Spent more than an hour perusing and ended up making two new boards. Sheesh! However, I was able to find something! An asparagus salad with tuna dressing from the Hellman's site that is apparently a Mario Batali recipe.
![]() |
| image from Hellman's recipe page |
So.... I opened one can of asparagus, drained them well, then put them in a skillet with just a half tablespoon of butter. While they were warming in the skillet on medium low, I put about a cup of mayonnaise, a couple of tablespoons of lemon juice, one large minced up clove of garlic, a pinch of salt, somewhere around a teaspoon-ish of dried dill, and half of the can of drained tuna in water in a bowl and mixed them all together. I let that sit and ruminate on how all those ingredients were working well with each other while the asparagus simmered in it's buttery goodness. Once the asparagus was heated through, I just placed it on a plate then spooned the tuna mixture on top. Done. I think it would have been even better with a few thinly sliced pieces of Monterey Jack on it.
I didn't photograph it. Mainly because I was hungry, but also because I didn't even think about blogging it. Just know it looked just as good as that image from the website. And tasted even better!
The amounts that I used were more of a two serving meal as I had enough left that I can warm it up for lunch tomorrow. If I fixed this for everyone, I would double it. If you try it (or something similar), let me know how it turns out!
Wednesday, September 18, 2013
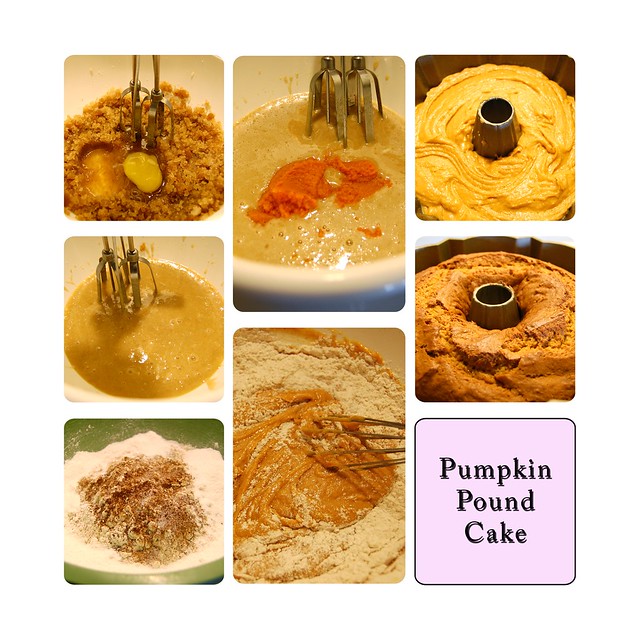
Pumpkin Pound Cake
Original post from September 26th, 2011:
I'm happy to share this recipe. It was simple and only took an hour to cook. It's not too pumpkin-y, not too sweet, but a perfect combination of bread and sweetness. Y'all will love it, I promise!
Pumpkin Pound Cake
Serves 12-16.
What y'all need:
- 1 cup granulated sugar
- 1 cup brown sugar
- 1 cup canola oil
- 3 eggs
- 3 cups all-purpose flour
- 2 teaspoons baking soda
- 1 teaspoon ground cinnamon
- 1 teaspoon ground nutmeg
- 1/2 teaspoon salt
- 1/4 teaspoon ground cloves
- 1 package instant vanilla pudding mix
- 1 can (15 ounces) pumpkin puree
- Confectioners’ sugar, for dusting
How y'all fix it:
In a large bowl, combine sugar and oil until blended. Add eggs, one at a time, beating well after each addition.
In a separate bowl, combine flour, baking soda, cinnamon, nutmeg, salt, cloves and pudding mix; add to egg mixture alternately with pumpkin, beating well after each addition. Transfer to a greased bundt pan.
Bake at 350 degrees for 60-65 minutes or until toothpick inserted near the center comes out clean. Cool for 10 minutes before inverting onto a wire rack. Remove from pan and cool completely. Dust with confectioners’ sugar.
I followed everything except for the confectioners' sugar. I made some icing to drizzle over the cake instead. Except I made it too thin and it didn't really turn out the way I wanted. So we just ate it without any topping at all! Again the kids really liked it even knowing it had pumpkin in it!
Friday, September 13, 2013
Pumpkin Spice White Hot Chocolate
That's right folks! It's time for pumpkin flavored everything!! I thought I'd revisit a recipe or two from the archives. First up, pumpkin hot chocolate!
Original post from September 17th, 2011:
Since it's become very Fall-like around here lately, I decided it was time to start looking for more Fall-like recipes! Pinterest is awesome for this (as well as basically everything else under the sun). I found this great recipe for Fall hot cocoa at Good Life Eats.

What you need:


Original post from September 17th, 2011:
Since it's become very Fall-like around here lately, I decided it was time to start looking for more Fall-like recipes! Pinterest is awesome for this (as well as basically everything else under the sun). I found this great recipe for Fall hot cocoa at Good Life Eats.
What you need:
- 4-5 cups of milk
- 12 oz. pkg of white chocolate
- 4 teaspoons cocoa powder
- 3/4 teaspoon vanilla extract
- 1 cup pure pumpkin puree
- 1 teaspoon cinnamon
- 1/2 teaspoon nutmeg
- 1/4 teaspoon cardamom
- 1/8 teaspoon all spice
- 1/8 teaspoon ground ginger
How to make:
In a lrg saucepan, combine 2 cups of milk with white chocolate and cocoa powder. Stir over medium heat until chocolate is melted and combined.
Whisk in puree, cinnamon, nutmeg, cardamom, allspice, and ginger.
Add the remaining milk, one cup at a time until you like what you see. (It was about this time when I realized my pan wasn't quite big enough...)
Top it off with some whipped cream and a sprinkle of nutmeg!
Really very easy and warm and yummy! I think next time I may use a bit less pumpkin puree though. It was a bit... um, gritty? Gritty isn't really the correct word, but it's the closest I can come up with. Everyone liked it (even the kids!). A great drink for warming up!
Monday, September 9, 2013
Yes, I'll Take Some Coffee in My Milk
I'm not exactly a coffee aficionado. If it's just a plain up of black coffee... ick. Not a fan. I require a cup of milk/creamer and sugar with a splash of coffee.

Firstly, let me tell you that you need a LARGE container. I reused an old creamer container, but it wasn't the larger size so I had an excess. Luckily my in-laws live in walking distance so I took my extra to them.
The base ingredients are as follows:
14 oz. can sweetened condensed milk
1 3/4 cup of milk or cream (any kind of milk - 2%, whole, soy, almond, etc. OR half & half, heavy, etc.)
--The more fat content the creamer the mix.
I chose to use heavy cream instead of milk, but I'll tell you now that I think it's too thick. Next time I'll get half & half. I also couldn't find a few extracts that weren't imitation. I suppose if I had been shopping somewhere other than Wal-Mart, I would have found "real" extracts. I chose to make the Eggnog creamer. Mostly because I forgot the chocolate syrup.
Eggnog
replace milk in base recipe with equal amount of heavy cream
1 teaspoons vanilla extract
2 teaspoons rum extract
1 teaspoon ground nutmeg
I mixed the sweetened condensed milk and heavy cream in a 4 cup glass measuring cup. I took a couple of tablespoons of the mix and warmed it in the microwave then added the ground nutmeg to make sure it would mix well. Then added it back to the measuring cup and stirred until it was combined.
Next add the extracts and stir, stir, stir! Done.
I don't think it tastes like eggnog. It tastes like those awesome butterrum flavored Lifesavers! Mmmm.... butterrum.
There are 23 different flavor recipes on her page. A few that I'm excited to try next...
-Almond Joy
1-2 teaspoons coconut extract (or sub coconut milk or cream of coconut if you heat it first, strained, in place of the milk & extract)
1 teaspoon almond extract
2 tablespoons chocolate syrup
-Strudel
1 tablespoon cinnamon
1 teaspoon vanilla extract
1 teaspoon almond extract
-Peppermint Patty
2 tablespoons chocolate syrup
1 teaspoon peppermint extract
Now go forth, my fellow coffee addicts and make gallons of flavored creamers for a fraction of the cost!
Store bought creamer can get pretty expensive. On average, a bottle is around $3. I can go through at least two of those a week. Last week, my MIL posted a website to my Facebook page with do-it-yourself creamer recipes. A quick look at her site shows that WOWZERS this post has been pinned on Pinterest more than 900 times!!
Firstly, let me tell you that you need a LARGE container. I reused an old creamer container, but it wasn't the larger size so I had an excess. Luckily my in-laws live in walking distance so I took my extra to them.
The base ingredients are as follows:
14 oz. can sweetened condensed milk
1 3/4 cup of milk or cream (any kind of milk - 2%, whole, soy, almond, etc. OR half & half, heavy, etc.)
--The more fat content the creamer the mix.
I chose to use heavy cream instead of milk, but I'll tell you now that I think it's too thick. Next time I'll get half & half. I also couldn't find a few extracts that weren't imitation. I suppose if I had been shopping somewhere other than Wal-Mart, I would have found "real" extracts. I chose to make the Eggnog creamer. Mostly because I forgot the chocolate syrup.
Eggnog
replace milk in base recipe with equal amount of heavy cream
1 teaspoons vanilla extract
2 teaspoons rum extract
1 teaspoon ground nutmeg
I mixed the sweetened condensed milk and heavy cream in a 4 cup glass measuring cup. I took a couple of tablespoons of the mix and warmed it in the microwave then added the ground nutmeg to make sure it would mix well. Then added it back to the measuring cup and stirred until it was combined.
Next add the extracts and stir, stir, stir! Done.
I don't think it tastes like eggnog. It tastes like those awesome butterrum flavored Lifesavers! Mmmm.... butterrum.
There are 23 different flavor recipes on her page. A few that I'm excited to try next...
-Almond Joy
1-2 teaspoons coconut extract (or sub coconut milk or cream of coconut if you heat it first, strained, in place of the milk & extract)
1 teaspoon almond extract
2 tablespoons chocolate syrup
-Strudel
1 tablespoon cinnamon
1 teaspoon vanilla extract
1 teaspoon almond extract
-Peppermint Patty
2 tablespoons chocolate syrup
1 teaspoon peppermint extract
Now go forth, my fellow coffee addicts and make gallons of flavored creamers for a fraction of the cost!
Tuesday, March 26, 2013
Tasty Tuesday! Mandy's Meat Pies
Most of you probably don't know that several years ago I worked at Wal-Mart for five whole years. I didn't have to check out groceries. I had the pleasure of working the jewelry department counter for all of those years. I took a few things away from that job. Knowledge about Wal-Mart that I'd rather not have, realization that the time I spent there wasn't the best years in my life (that's a post for another day when I have the guts to be more open) that was in no way Wal-Mart's fault, but my own, and the best jewelry department girls that Wal-Mart has ever seen as friends.
Annie, Missy, Mandy, Christy, Ashley, Tabitha, and Mary were some of the funniest and most interesting people I've met in my life. There were a few duds in our day... April, Amy, LaVitra..., but we survived them. Sort of! We had the best Christmas parties. Every year Mandy brought her meat pies. Scrumptious meaty pie-y goodness. Mmmm....
I had almost forgotten about them until a few days ago when I was going through an old recipe box of mine. I found the recipe! I was so excited! Probably more excited than I should have been about finding a folded up piece of old paper. I can't wait to share this with y'all!
Ingredients:

3 cans of flaky biscuits
1 pound ground beef
2 cups raisins
2-3 Tbsp ketchup
1/2 cup olives, chopped
1/2 small onion, chopped
3 cloves of garlic, chopped
1 Tbsp teriyaki sauce
1 egg
Meat tenderizer
Do it up:
Preheat oven to 375F.
Cook the beef and drain. Season with meat tenderizer.
Add onions and garlic.
Cook until onions are soft, then add teriyaki sauce, ketchup, olives, and raisins. Mix well and cook to heat; stirring occasionally.
Roll out individual biscuits until flat.
Spoon meat mix onto dough.
Wet edges slightly, fold, and press with fork to seal.
Stab top of pastry with fork so air can escape and brush tops with beaten egg.
Bake in oven at 375F until golden brown. Enjoy!
A few notes:
-- I only used two cans of 8 ct. Great Value brand biscuits. Recipe is easily adjusts to feed more or less people.
-- Teriyaki sauce matters. I forgot it and they didn't taste the same.
Annie, Missy, Mandy, Christy, Ashley, Tabitha, and Mary were some of the funniest and most interesting people I've met in my life. There were a few duds in our day... April, Amy, LaVitra..., but we survived them. Sort of! We had the best Christmas parties. Every year Mandy brought her meat pies. Scrumptious meaty pie-y goodness. Mmmm....
I had almost forgotten about them until a few days ago when I was going through an old recipe box of mine. I found the recipe! I was so excited! Probably more excited than I should have been about finding a folded up piece of old paper. I can't wait to share this with y'all!
Mandy's Meat Pies
Ingredients:

3 cans of flaky biscuits
1 pound ground beef
2 cups raisins
2-3 Tbsp ketchup
1/2 cup olives, chopped
1/2 small onion, chopped
3 cloves of garlic, chopped
1 Tbsp teriyaki sauce
1 egg
Meat tenderizer
Do it up:
Preheat oven to 375F.
Cook the beef and drain. Season with meat tenderizer.
Add onions and garlic.
Cook until onions are soft, then add teriyaki sauce, ketchup, olives, and raisins. Mix well and cook to heat; stirring occasionally.
Roll out individual biscuits until flat.
Spoon meat mix onto dough.
Wet edges slightly, fold, and press with fork to seal.
Stab top of pastry with fork so air can escape and brush tops with beaten egg.
Bake in oven at 375F until golden brown. Enjoy!
A few notes:
-- I only used two cans of 8 ct. Great Value brand biscuits. Recipe is easily adjusts to feed more or less people.
-- Teriyaki sauce matters. I forgot it and they didn't taste the same.
Subscribe to:
Posts (Atom)